HOW TO CHANGE BLOGSPOT TO DOT COM
The Blogger Platform is such a great starting point for anyone interested in starting a blog. WordPress is definitely more difficult to learn and it also costs money for hosting, so if you’re just getting your feet wet, having a Blogspot blog is a free, convenient option! If you’re like me, perhaps you didn’t know that you can switch your Blogger blog to have a custom domain. Custom domains look more professional and they are easier for others to remember. Today I am going to show you how to to change Blogspot to Dot Com so you can lose the word “blogspot” at the end of your domain name. At first glance, it might look daunting but I promise these step-by-step pictured instructions are very simple to follow and you only have to do it once.
Today we’re showing you how to change blogspot to dot com on your blog domain with pictured instructions showing the step by step process.
The Blogger Platform is such a great starting point for anyone interested in starting a blog. WordPress is definitely more difficult to learn and it also costs money for hosting, so if you’re just getting your feet wet, having a Blogspot blog is a free, convenient option! If you’re like me, perhaps you didn’t know that you can switch your Blogger blog to have a custom domain. Custom domains look more professional and they are easier for others to remember. Today I am going to show you how to to change Blogspot to Dot Com so you can lose the word “blogspot” at the end of your domain name. At first glance, it might look daunting but I promise these step-by-step pictured instructions are very simple to follow and you only have to do it once.
HOW TO CHANGE BLOGSPOT TO DOT COM
1. First, you need to purchase your domain.
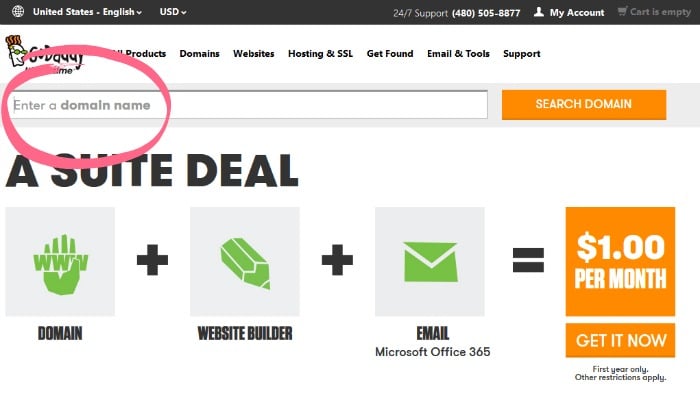
- Go to GoDaddy.com
- Search for your domain name in the search bar near the top of the page.
- When you find a domain that is available, add it to your cart and purchase it!
TIP: GoDaddy always has coupons, so you should NEVER pay more than a couple dollars for your domain. Some of the people I have helped set up a blog have gotten their domain for as little as 99 cents the first year.
2. Sign into your Blogger dashboard. Then…
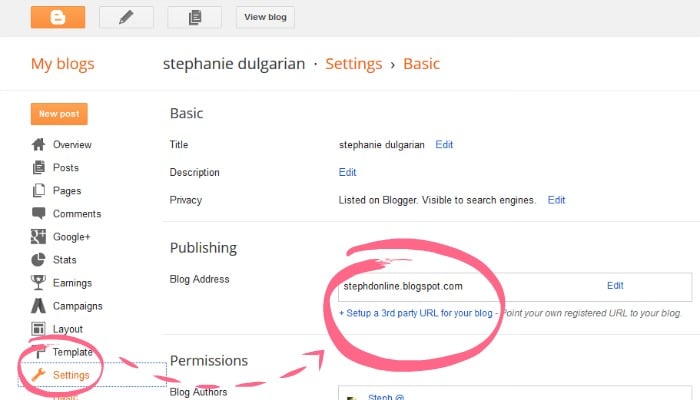
- Click the Settings tab.
- Under the Publishing header, you should see your current blog address.
- Right under that, click +Setup a 3rd party URL for your blog
3. Change the blog address
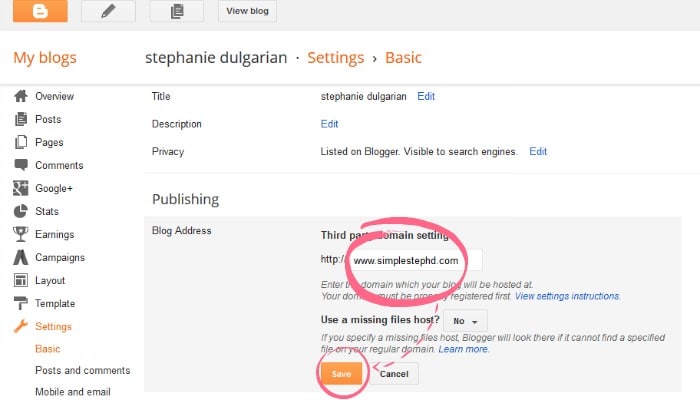
- Under “Third party domain settings”, type the url of the domain you’ve purchased.
- Keep in mind that it must begin with www in order to work.
- Click Save.
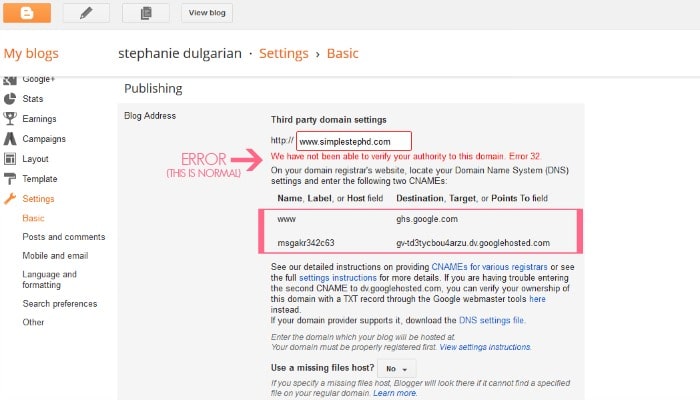
You should see an error- this is normal!
Below the error there will be two CNAMEs.
Each CNAME is composed of two parts-
The first CNAME is the same for everyone- Name being “www” and Destination “ghs.google.com.”
The second CNAME is different for everyone.
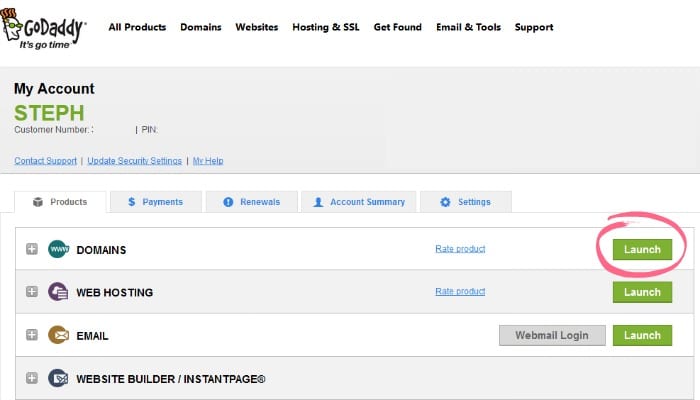
4. Login to your GoDaddy account and launch the Domain menu.
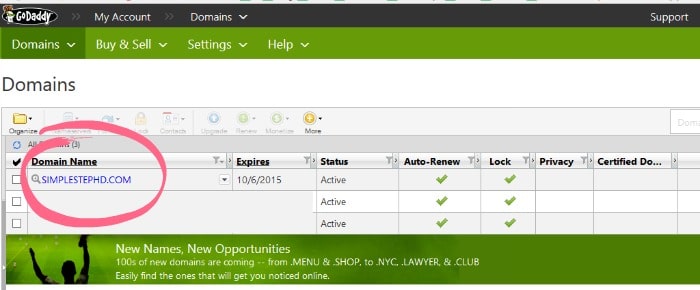
5. You will see a list of all the domains you own.
- Click the domain name you are wanting to use.
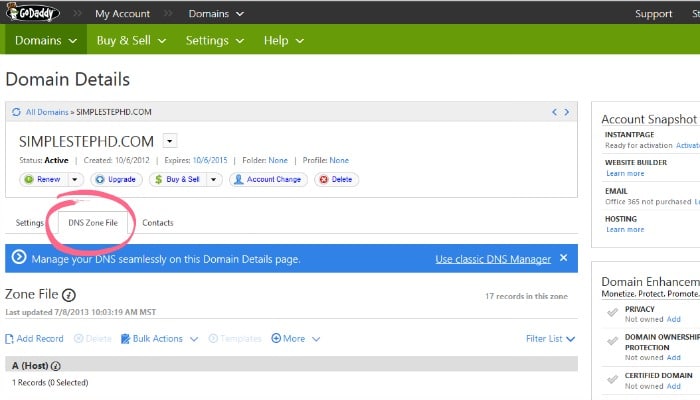
6. Click the DNS Zone File Tab.
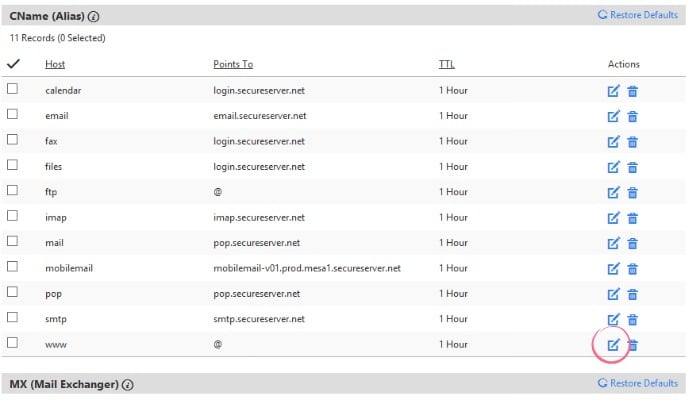
- Scroll down until you see the section titled “CName” (Alias)
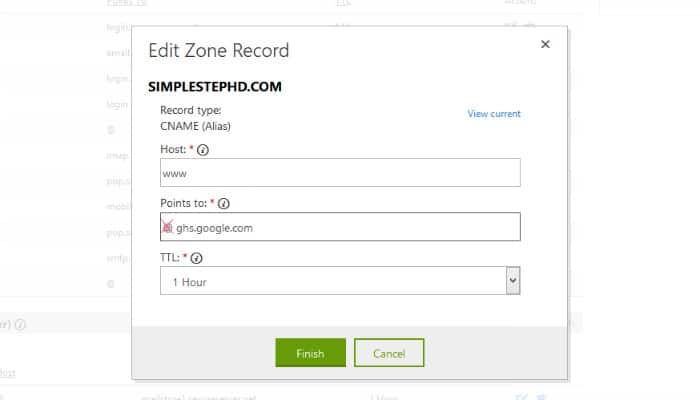
7. Click the “edit” button next to www
8. Enter the following info:
- Where it says “Host” simply enter www
- Where it says “Points to”, delete the @ sign and enter ghs.google.com
- Click Finish, which will bring you back to the Domain Details page.
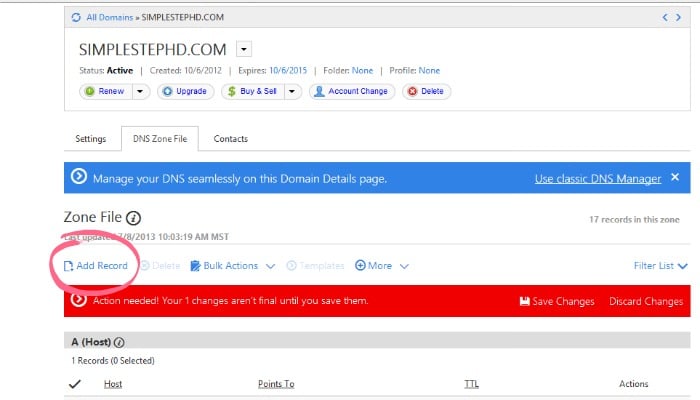
9. Click Add Record.
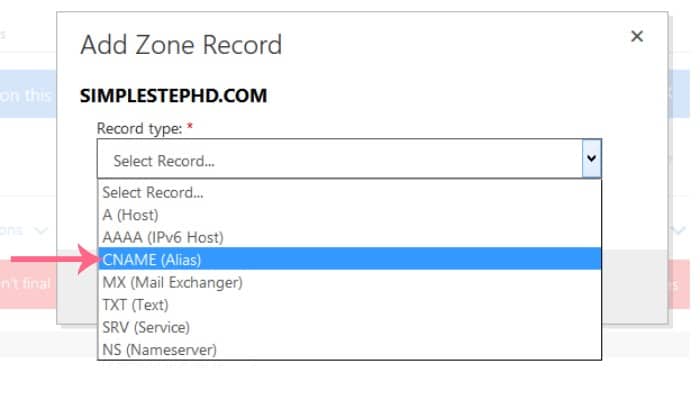
10. On the pop up screen, select CNAME Alias
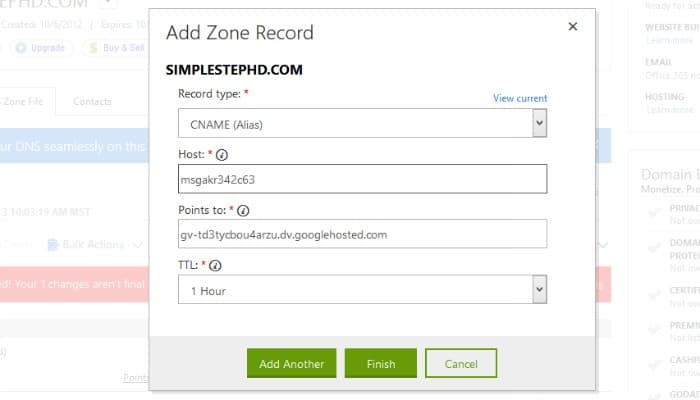
11. Enter the info under the ERROR message on your Blogger Dashboard
- These codes will be different for everyone, so do not enter the info you see above.
- Click Finish.
12. Now we need to add “A Records”, which will make it so that when people forget to type “www” before your domain they can still get to your blog.
- Click Add Record on the Domain Details Page
- Highlight “A (host)“
- In the “Host” box, enter the @ sign
- In the “Points to” box, enter this IP Address: 216.239.32.21
- Save that, then repeat those steps 3 more times with the following IP Addresses:
216.239.34.21
216.239.36.21
216.239.38.21
13. Lastly, delete the first A Record- you don’t need it anymore.
- Save all changes before exiting out of GoDaddy!
Now you can go back to Blogger and try redirecting everything to your new domain again by following step 3 in this tutorial. It is completely normal for this to take up to 48 hours for the changes to be complete, so be patient!!! (And your site will still work during this transition time, so don’t worry!)
1. First, you need to purchase your domain.
- Go to GoDaddy.com
- Search for your domain name in the search bar near the top of the page.
- When you find a domain that is available, add it to your cart and purchase it!
TIP: GoDaddy always has coupons, so you should NEVER pay more than a couple dollars for your domain. Some of the people I have helped set up a blog have gotten their domain for as little as 99 cents the first year.
2. Sign into your Blogger dashboard. Then…
- Click the Settings tab.
- Under the Publishing header, you should see your current blog address.
- Right under that, click +Setup a 3rd party URL for your blog
3. Change the blog address
- Under “Third party domain settings”, type the url of the domain you’ve purchased.
- Keep in mind that it must begin with www in order to work.
- Click Save.
You should see an error- this is normal!
Below the error there will be two CNAMEs.
Each CNAME is composed of two parts-
Each CNAME is composed of two parts-
The first CNAME is the same for everyone- Name being “www” and Destination “ghs.google.com.”
The second CNAME is different for everyone.
The second CNAME is different for everyone.
4. Login to your GoDaddy account and launch the Domain menu.
5. You will see a list of all the domains you own.
- Click the domain name you are wanting to use.
6. Click the DNS Zone File Tab.
- Scroll down until you see the section titled “CName” (Alias)
7. Click the “edit” button next to www
8. Enter the following info:
- Where it says “Host” simply enter www
- Where it says “Points to”, delete the @ sign and enter ghs.google.com
- Click Finish, which will bring you back to the Domain Details page.
9. Click Add Record.
10. On the pop up screen, select CNAME Alias
11. Enter the info under the ERROR message on your Blogger Dashboard
- These codes will be different for everyone, so do not enter the info you see above.
- Click Finish.
12. Now we need to add “A Records”, which will make it so that when people forget to type “www” before your domain they can still get to your blog.
- Click Add Record on the Domain Details Page
- Highlight “A (host)“
- In the “Host” box, enter the @ sign
- In the “Points to” box, enter this IP Address: 216.239.32.21
- Save that, then repeat those steps 3 more times with the following IP Addresses:
216.239.34.21
216.239.36.21
216.239.38.21
216.239.36.21
216.239.38.21
13. Lastly, delete the first A Record- you don’t need it anymore.
- Save all changes before exiting out of GoDaddy!
Now you can go back to Blogger and try redirecting everything to your new domain again by following step 3 in this tutorial. It is completely normal for this to take up to 48 hours for the changes to be complete, so be patient!!! (And your site will still work during this transition time, so don’t worry!)


No comments:
Post a Comment